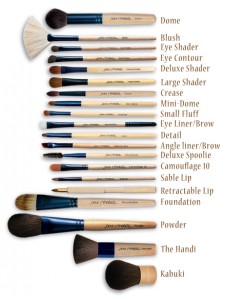
As a makeup artist, I most often get the following questions: “What brushes should I use?” and “Are they really necessary?” There are so many types of brushes out there, that I realize it can be a daunting task trying to decide what to choose. I have worked with a few different brands, and right now I’m loving Jane Iredale! I’m pretty obsessed with her makeup; dermatologists have called it the “healing makeup,” and I’d have to agree! Of course, I have other favorites out there, but for today, I’ll focus on her brushes. Jane’s brushes, as well as her entire makeup line, is cruelty-free. Thank goodness for a makeup company that wants to help protect not only your skin, but everything around us as well!
Here is a current list of her entire brush line:

Which do you choose out of all these magnificent brushes, you ask?? ALWAYS start with the basics, and then go from there. Ask yourself which type of foundation you use (loose, pressed, or liquid), and don’t forget your concealer brush – it’s definitely an important one!
Concealer:
I’d highly recommend the camouflage 10; this can also be used for the inner corner of your eye, under your bottom lash line, and slightly highlighting the brow bone.
Pressed Powder:
The Handy or Kabuki brush help apply the right amount of pigment to your skin, giving you a nice even tone. The size of the bristles itself are important to look at when using a pressed powder.
Loose Powder:
The Kabuki brush is bringing it, again! You can also use the Powder brush – both of these will give you the right coverage, without adding too much makeup. *Before applying loose powder give the brush a slight shake to release excess amount of makeup.
Liquid:
The best brush for any type of liquid (cream, tinted moisturizer, or serums) is the Foundation brush. *After applying liquid foundations with a brush, I always take my ring finger and gently run it across my skin to smooth any lines.
Now, on to your Eyes!!
You will need a few brushes – depending on the details you’d like to add. Once again, I’m just showing you the basics. A few of the smaller brushes in the kit are used for intricate lines and details; these aren’t always necessary, but are great to have when you are wanting to play around with color!
Eye Shader:
This is used to apply the base color on the lid, and can also be used for contouring the accent color in your crease. The accent/contour color is typically the darker shade of eyeshadow.
Eye Contour:
I personally love this brush when it comes to adding the contour shade. This brush helps to create the “V” shape towards the outside corner, which gives your eye the perfect lift!
Deluxe Shader:
This particular brush is the blender of all blending brushes. It’s the Bee’s knees.  It’s also great for adding a slight bit of color to your lid without giving you a harsh line. The longer bristles will add less pigment, and if you’re looking for that good ol’ natural look, this brush is just what you need!
I hope this was helpful in your search for makeup brushes! Never be afraid to try something new, and always have fun experimenting!
Happy Makeup Monday, ladies!
xo -Britney
Britney is an SMP Beauty Stylist, and is a professional Makeup Artist + Hair Stylist at J. Michael’s Spa & Salon. If you would like Britney to help you create and achieve a new beauty look, we can easily get you all set-up with her via our SMP Beauty Package. Have a beauty-ful day!


0 Comments